
To Riptide Target, or not to Riptide Target — that is the question.
For me, the biggest news in recent Theorycraft was Dayani’s excellent analysis on Chain Heal, High Tide, and Glyph of Riptide (which you can find here). I was inspired enough to devote some time to looking at how to extend Dayani’s model (I blogged about it), and I still think it’s a fantastic piece of research. However, as I’ve said previously I think that Theorycraft is a science; it is essential to extend that initial study with further work. I’ve been talking about my approach to studying Chain Heal in a series of posts (1 2 3 4 5 parts and counting!), and one of my main aims is to see if I can replicate Dayani’s results in simulation.
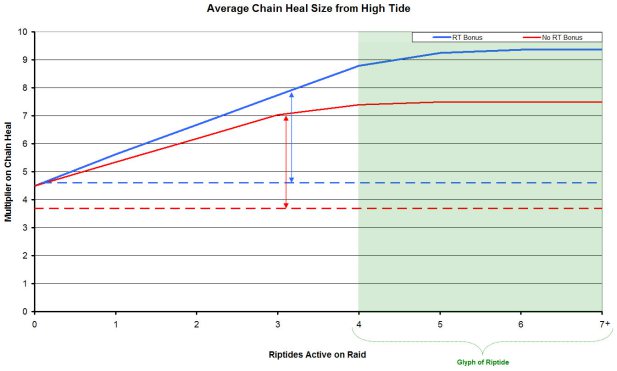
Courtesy of Dayani, visit her blog and read her stuff!
The maths she carried out checks out perfectly, and she makes some very strong points on the calculations she made. In a nutshell, Dayani looked at how Chain Heal’s mean healing increased dependent upon whether you chose a Riptide target or a target without Riptide (henceforth “RTT” and “nRTT”, respectively). She found that in every situation she calculated, it was always an advantage in terms of mean healing to heal a RTT (regardless of number of Riptides on the raid). She concluded that as in Mists and Cataclysm, Warlords will be dominated by Shaman using people with Riptide essentially as Chain Heal turrets. This is a reasonable conclusion based on her work, and I can replicate her results no problem at all. It’s extremely strong as an investigation, and if you’re lazy you can find a TL:DR at the end.
However, there are plenty of reasons to doubt whether this is indeed the truth.
To begin, let’s just assume that she’s entirely correct – as a Scientist and Theorycrafter I feel it’s my duty to (within reason) doubt others’ work so that we might move closer to the truth. That’s how science is done, and I think it’s a strong mark of respect to advance others’ work. So the first and most fundamental reason for me doing this work is the principle of the thing. However, don’t think that I’m trying to disprove Dayani – I would love nothing better than to see her results correct!
Additionally, I established using CHsim that although the statistics Dayani used (and I then extended) were a good approximation for the cases of analysis, they’re not actually correct in strict terms. To quote George E. P. Box; “All models are wrong, but some are useful.” We need to know how useful the model Dayani and I have been using actually is, and that requires a method of controlled testing of its predictions.
Finally, there was this little conversation on Twitter which started Dayani along the road to her analysis;


Now in the first pair of tweets you can clearly see Celestalon saying the opposite to what Dayani ended up concluding in her analysis. This is a mystery! In fact the mystery is reinforced when we look at the second pair and see again Celestalon saying that Chain Heal targeting matters. That’s again the opposite of what Dayani concluded. Now, I’ve already said how strong her analysis is but I do suspect that Celestalon knows something that we don’t. We must find out! For Science Theorycraft!
So going forward, I’m going to run you through an abbreviated version of the stream of conciousness that I have been subject to on this matter over the past several weeks. I’m going to do my best to step you through the investigations I’ve made so that you can see why I come to my conclusions. Sometimes, that will involve me doing things that don’t really make sense – I attribute this to my own instinct as a researcher. Bear with me, for things come together in the end.
The heartache, and the thousand natural shocks / That raids are heir to.
How do we start looking into this? Well, I started by posing a question; should I be casting Chain Heal on a Riptide Target (“RTT”)? – Ideally, I’d like a clear “yes” (a “no” would be almost as good, if a little confusing). It was an easy decision to use my Chain Heal simulator, CHsim, to ask this question; after all, this is literally what I built it to do. I started by ensuring that the code I had could simulate a variety of different strategies. They’re listed below with my shorthand for them in italics;
- Target the lowest hp RTT; RT.
- Target the lowest hp nRTT; noRT.
- Target a random nRTT; rnoRT.
- Target a random RTT; rRT.
- Target the lowest hp player in the raid; low.
- Target a random player; rand.
That should give us a very good exploration of the whole parameter space, but we only really care about numbers 1 and 2 (RT and noRT) for the purposes of this investigation.
Having established that I could simulate the relevant things, I turned to establishing outputs. The first step is really to look at the healing output on each jump for different strategies; once we’ve established that we can get that output we can move on to more and more sophisticated analyses. I decided to use the Mastery benefit from each jump of Chain Heal as a measure of the healing.
This is called a “proxy measure” and it’s not ideal; I chose it primarily because it was easy to do and also because Mastery bonuses are governed by the health of the party member; we should be able to see interesting patterns as we ramp up the incoming damage (more on that later!). I realise this isn’t an ideal measure, but don’t give up on my conclusions just because of that.
So; how does the mean Mastery Bonus on each Chain Heal jump change with varying strategies for targeting? I basically picked a simulation setup analogous to one I ran previously (keeping constant the goal of having 4 Riptides active on the raid) and plotted the mean Mastery bonus for each jump. Here are some samples of the results;


We can immediately see some interesting patterns appearing. First, we see the effect which Dayani discussed where the RT strategy (graph 2) generally has fewer bounces than the nRT strategy (graph 1). In contrast, the healing from the first three jumps of Chain Heal when you use the strategy RT is larger on average than those for nRT – entirely as expected. Once we get into High Tide range though (bounce numbers 4 and up) all bets are off – using nRT actually heals for more on average, and that’s entirely because you get more of those jumps. Again, this isn’t unexpected! Finally, we see that the strategy rand actually provides a tradeoff between the two; since it’s randomly targeted you have a chance to have either behaviour; on average it is a mixture of the two.
To cast–perchance to chain: ay, there’s the rub, For in that cast of healing what chains may come…
Now we should pose the question; does the benefit of more bounces make for more benefit overall? – That’s an easy question to ask, since all I have to do is to add up all the values in each of the plots above (and similarly for all the other strategies) and plot those values together; bigger is better! This got me plotting things like this;

This plot led me to think that variants of RT are better than other strategies (i.e. it matters not whether you pick the lowest or a random target, it matters that you pick a RTT over a nRTT. This is just what Dayani concluded – fantastic! When I calculated the discrepancy from this graph and compared it to Dayani’s predictions, I found that Dayani’s results came out as 6% better when you cast on an RTT; my results said 11% with an uncertainty of 6% – i.e. within the uncertainty of my simulation my results agree with Dayani’s. Fantastic!
BUT
Whether ’tis nobler in the mind to suffer
The slings and arrows of outrageous RNG
A good researcher can’t just leave it there, and if I pride myself on anything it’s that research is a particular talent of mine. We have to make sure that this isn’t a fluke – time to pick holes in my own work. What’s the weakest point? Well, at this point I saw two; one was the size of the uncertainties (6% in 11%? That’s huge!) and the other was that this was for one specific value of the outgoing damage. We know that Mastery is dependent on health, and as a result I’ve shown it’s dependent on mean health values, and as a result of that it’s obviously stronger when higher damage goes out. So what happens when I vary the outgoing damage?
I tackled the first problem by two methods; one, by moving to a technically more accurate estimate of the uncertainties (where I was previously plotting error bars as standard deviation, it’s more correct to use the standard error in the mean; a significant difference at high sample sizes!) and increasing the sample size of my simulations.
I also wanted to look at varying damage values, so I started by just picking another value of damage to sim and going for it. Here’s what I got; noRT was 22% better than RT.
What the actual f? Clearly, something is wrong here, right? That seems so disastrously out of kilter with the Theorycraft that it bears much closer inspection. Is my initial result coincidence, or have I got something horribly wrong?
Or to take arms against a sea of troubles
And by opposing end them.
Well, I can’t tell you for sure that my simulation is perfect. I’m not going to pretend that I can guarantee it; my coding ability, while good, is not on the level of a professional; I’ve been working on this sim off and on for a long time; there might be a small bug that isn’t fatal to execution and hasn’t shown up in any of the tests I’ve done for accuracy. It might just be wrong. But I don’t think it is – all the potential causes I thought up came up blank. Believe me, I want nothing more than to have an uncontroversial result but… I can find no fault in my simulation here. Until such time as I know otherwise, I’m going to have to take the results I see as reflecting reality (such as that is).
So then, upon the assumption that the sim is actually correct – and I reserve the right to take back my conclusions if necessary – we should push forward to try to understand why we see this result. First, let’s systematise this by making a sweep of the damage levels – from “somewhat small” incoming damage to “somewhat high” levels – this took some fiddling, since my measures of Chain Heal’s power is rather arbitrary. However, I found a parameter sweep which reflects the spectrum of “low” to “high” as required.
Next, for each damage level I go ahead and calculate the percentage increase in Mastery bonus when you use RT over noRT. A positive result means that it’s better to cast onto a RTT, negative means it’s better to cast onto a non-RTT.

Now, I was expecting something strange but this really shocked me. With the parameters I’d chosen, an increase in relative damage from low (left) to high (right) the benefit starts high (about 7% in agreement with Dayani’s results), decreases, and then becomes negative – by the previously observed 22%! Then upon further increase it goes back up extremely high and extremely quickly! This just doesn’t make sense to me at face value – undoubtedly this is the reason I saw two conflicting answers earlier. But what’s going on here? I admit to being baffled and scared at this point in the narrative – I went back and checked my code again. Still nothing (sorry).
Or again, despite the good uncertainties in the plot is this literally a fluke? I re-ran the simulation two more times and plotted them next to each other. The results were almost identical, reinforcing the notion that there’s something in this which we need to understand;

But that the dread of something after death,
The undiscovered country, from whose bourn
No traveller returns.
So – let’s reflect briefly on what this could be if it’s reflecting reality. The first thing which I suspected was that there was a quirk in the fight length of the simulation. Perhaps, by a sheer fluke of chance the fight length (60 seconds) is just long enough to build up lethal damage on some people when using some targeting strategies but not others. That seems like a reach, but we could well be seeing people dying more from strategy 1 than strategy 2, and that would certainly skew the results.
However, if we’re talking about deaths isn’t this a result of too little healing (and therefore something we want to measure) rather than a bug in itself. That is to say – if people are dying due to low HPS and as a result we’re seeing that one strategy does more healing than another, that is the sim telling us something – namely, that one strategy is superior to another in some condition.
But hold that thought, I’ll come back to that in a second. Let’s first check whether fight length does have an effect on the results. I went through and ran the sim for half the time – you’d expect that if fight length has a strong effect we’d see something like a move in the peak position. Here we are;

So the structure of the plot is basically the same, except we see that the benefit we saw in casting on a RTT in the previous plot is reduced – at low damage, it isn’t there at all! This heavily implies that although simulation time does have an effect, it’s not likely to be on deaths.
To look at the deaths side of things, I ran these simulations at fixed damage rates and counted the number of deaths on average at each damage rate. This takes a lot of computational effort for technical reasons in my implementation – something I hope to fix in future revisions, but it limited the amount of data I could gather. What I did get is presented in the table, below;
| Damage | RT deaths | noRT deaths | Agree within error? |
| 0.005 | 0 | 0 | YES |
| 0.125 | 5 | 1 | NO |
| 0.200 | 11 | 16 | NO |
As you can see, prior to the dip we have no deaths to speak with (there are rare cases, but vanishingly low numbers due to sample size), but when we’re at the sharpest part of the dip in the graphs above we have strategy 1 (RT) seeing more deaths than strategy 2 (noRT).
Calamity of so long life.
This is clearly telling us that there’s something in these strategies which suits one to lower damage and one to higher damage. To investigate this further, I decided that it was time to put in the effort and stop using proxy measures. Time to measure full healing values*!
* – Actually, the Mastery value was measured and converted to total healing post-simulation, which is remarkably easy and accurate to do. Since there is no RNG in the individial heal values in my simulation, I think this is a perfectly valid way of measuring total healing.
The first time I did it I got the same kind of plots which I expected, something more like this;

Which was lovely because it confirmed what I had already thought, but AHA! That’s when science usually jumps out on you – Confirmation Bias, I had it. Hidden somewhere in the new code I had to write for this part, there was a mistake. I had forgotten to account for the Riptide bonus on the main parts of the heal in the cases it should be calculated. That’s bad. So, I re-did that line of the code and re-ran all my simulations. This time, as well as having a look at different fight lengths I also looked for one specific fight length at what effect the Mastery level had upon the curves. Now I am beginning to confirm Dayani’s results.
Let’s start with the fight length sweep. The graphs which follow are for 30, 60, and 120 second fights respectively.


Wow! So at last we see the net gain which Dayani predicted and which seemed to make sense almost 3000 words ago when I started this post. Oh boy. We can see that the result (benefit in healing) is stable at low damage values and again shows this weird dip at a certain specific region of damage. At this point, the healing between RTT and noRTT is almost at parity, almost. As the incoming damage ramps up, so does the healing benefit from RTT strategies – because of the effects due to death which we saw earlier.
Just in case you’re not convinced by my idea about the deaths, I tried another kind of plot – simply the total healing for each damage value for each strategy all on the same graph. Here is an example for a 120 sec fight with 50% Mastery;

The column on the left is the RTT strategy, and on the right is the noRTT strategy. As the damage increases (dots, dark blue to cyan), the healing from the noRTT strategy increases until the two strategies are almost at parity. Then, as damage increases beyond some threshold (crosses, dark blue to cyan), the total healing done drops dramatically. This can only be due to deaths. At the same time, the total healing from RTT strategies stays pretty close to constant throughout – the healing must be more consistent and therefore better in the long run for the raid.
So I’m now fairly convinced that the predictions Dayani made are reasonable, qualitatively, if not quantitatively due to the rotational considerations which CHsim helps to account for.
As a final piece of checking I wanted to see if there was some variation in the behaviour when I change the amount of Mastery which my simulated character has. In the same manner as before, I plotted for 120 sec fights the damage-healing curves for three different levels of Mastery; 0%, 50%, 100% (10000% also tested, not shown; it was appropriately preposterous).


At 100% Mastery, you can see that at its best the noRTT strategy just becomes better than the RTT strategy (the center point is -ive and so off the scale). One thing to take away from this is that an increase in Mastery counterintuitively decreases the relative benefit of RTT strategies over noRTT strategies. However, the difference is small enough for me to be confident that I likely won’t ever scale my gear up to the point where I want to start casting off a non-Riptide target.
The fair Celestalon! — Sparkledragon, in thy equations / Be all my sins remembered.
All of what I’ve just said sounds and feels conclusive. It’s not. I want to point out before anyone else does that this study has flaws; the simulation is not true-to-WoW; my use of proxy measures delayed an accurate outcome; there are so many more parameters which could affect these results (relative base Chain Heal value compared to health pool size, for instance). However, we can still draw conclusions from the study. We now have a much stronger reason to believe that casting onto Riptide targets will be the optimal strategy in Warlords of Draenor. We might start to think that casting onto non-Riptide targets is actually dangerously variable in its output. Finally, and happily, it appears that Dayani was indeed correct.
But it still irks me that what we have found so far contradicts what Celestalon has been saying. I’m going to ask what he thinks of the work done so far, and I honestly don’t expect him to tell me I’ve hit the nail on the head. Maybe I am right so far, but I can’t help but think that the Devs at Blizzard are about 20 steps ahead of us right now. It’s not a fair advantage – they’ve stacked the deck in their favour and it’s all we can do to discover what little we can. One small comfort I am taking is derived from something my hero Richard Feynman once said; “Nature uses only the longest threads to weave her patterns, so each small piece of her fabric reveals the organization of the entire tapestry.” So it might be with Theorycraft.
TL:DR and what’s with all these stupid titles anyway?
If you couldn’t be bothered to read over 3000 words representing a thought process which took me weeks (and coding/simulation work which took several full days at the keyboard) then perhaps you’re not who I wrote this post for, but here is basically what we learned;
With lots of caveats, it is very likely that in WoD it will be better in terms of throughput to target your Chain Heal on a Riptide target, regardless of whether they are lowest on health or not.
That’s all you wanted to know, really. Now excuse me while I go and waste my free time on something entirely less constructive, like watching David Tennant’s Hamlet soliloquy again.

Very fun to read! I will have to read it a few more times to make sure I understand it all, of course. The Mastery metric seems solid and I want to think more about why the results all had the same pattern with that weird dip. I will probably pester you endlessly with questions 🙂
Oh I should add that later in that twitter chat between Celestalon and me, he said that “maybe the tuning is not there” for the Riptide bonus — as if the target-non-Riptided strategy might become viable once the Riptide bonus is small enough. I ran my model with a varying RT bonus and found 5% to be small enough for non-Glyph-of-Riptide scenarios. But my analysis is much more superficial than yours, so perhaps you could try to answer this question?
I have not had any luck getting a response to these issues, so I will be looking forward to seeing if you are more successful than I was! 🙂